Reducing your meat consumption is a great way to lighten your environmental footprint and help mitigate climate change. So, I challenge you to start by eliminating meat just one day a week from your diet! To that end, I’m going to share delicious meatless recipes here. I promise, they’ll be easy. 😉
- Sun Dried Tomato and Mushroom Pasta
- Crunchwrap Supreme
- Slow Cooker Chili
- Slow Cooker Lentil Soup
- Slow Cooker Burrito Bowls
- Creamy Roasted Red Pepper Pasta
- Thai Coconut Soup
- Instant Pot Carrot Ginger Soup
- Vegan Curry Ramen Noodles
- Mushroom Bourguignon
- Crunchy Tofu "Chicken" Nuggets
- Spicy Chickpea Veggie Burgers
- Brussels Sprouts and Pear Grilled Cheese
Recipe Credit: Julia’s Album
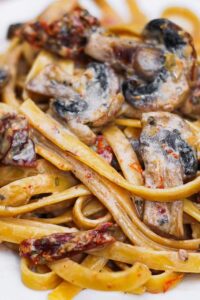
Sun-Dried Tomato and Mushroom Pasta in a Garlic and Basil Sauce
Servings:4
Ingredients
- 2 tablespoons olive oil
- 8 oz mushrooms sliced
- 3 garlic cloves minced
- 3.5 oz sun-dried tomatoes diced
- 2 Vegetarian “Chicken” Bouillon cubes
- 2 cups water
- 1/2 cup half and half
- 1/2 cup heavy cream
- 1/2 cup Parmesan cheese shredded
- 1 tablespoon dried basil or up to 2 tablespoons minced fresh basil
- 1/2 lb fettuccine pasta
Instructions
-
Heat olive oil on medium-high heat, add sliced mushrooms and garlic – and cook the vegetables for about 3 minutes. Add diced sun-dried tomatoes. Reduce heat.
-
Dissolve 2 cubes of chicken bouillon in 2 cups of boiling water. Carefully add the broth to the skillet – continue to cook the vegetables in a chicken broth on medium heat until the mushrooms and sun-dried tomatoes absorb some of the broth and the broth reduces somewhat. Add half and half, heavy cream and bring to boil just for a short moment. Add Parmesan cheese and cook the sauce, stirring, for a couple of minutes, on low-medium heat until the cheese melts. Add the basil.
-
If your sauce is too thick at this point – add another 1/2 cup half and half. If your sauce looks thin to you – do not continue simmering the sauce to thicken it as you will be adding pasta shortly (in the next step) – and pasta will absorb some of the sauce liquid. Even if the sauce looks thin now, it will not be so thin once you add pasta.
-
Cook fettuccine al dente according to the package instruction. Drain and rinse in cold water (this will stop the cooking). Add the fettuccine into the sauce and continue cooking the sauce with the pasta in it, on medium heat, for a couple of minutes (or more – to achieve the desired thickness) stirring constantly to coat well.
- Note: do not add salt to the creamy sauce because it should already be salty enough from the dissolved chicken cubes. Only in the very end when the sauce is done, you may add some salt if needed.

Crunchwrap Supreme
Recipe Credit: Kathy’s Vegan Kitchen
Ingredients
- 4 large whole wheat burrito tortillas, plus 4 small tortillas (0r one cut into four equal quarters)
- 1 15 ounce can black beans, rinsed and drained
- 1 cup Skinny Nacho “Cheese” Sauce
- 2 jalapeños
- 2 cups cooked brown rice
- 2 Avocados, pit removed, and cut into bite sized pieces
- 1 cup grape tomatoes, diced
- 1 yellow onion, diced
Instructions
- Prepare all vegetables
- Lay one tortilla on a plate surface
- Place a 1/4 cup of cooked brown rice in the middle
- Place 1/4 of the can of black beans on top of the rice
- Continues with 1/4 of the remaining ingredients.
- Lay a single small tortilla or a quart of an extra large tortillas on top of the ingredients in the center.
- Fold the tortilla around the ingredients in a circular motion, meeting the small tortilla or quartered tortilla you used for the center.
- Heat a Non-Stick Pan for Oil-Free Cooking to medium low
- Place tortilla folded side down first; this will seal the folds
- Cook for about 7 minutes; check to make sure golden brown before flipping over
- Gently flip crunch wrap over
- Cook another 7 minutes, checking to make sure it is golden brown.
- Make remaining 3 (I use different pans to have them all done at once).
- Serve with salsa or guacamole or BOTH!
- I cut in half to share 🙂
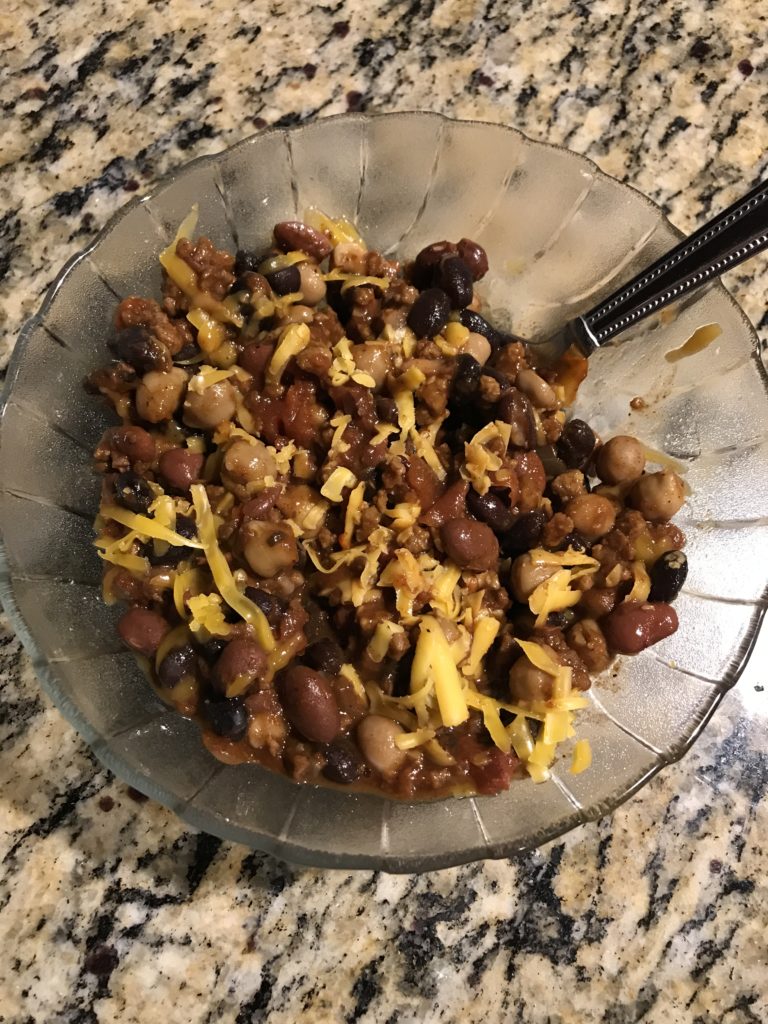
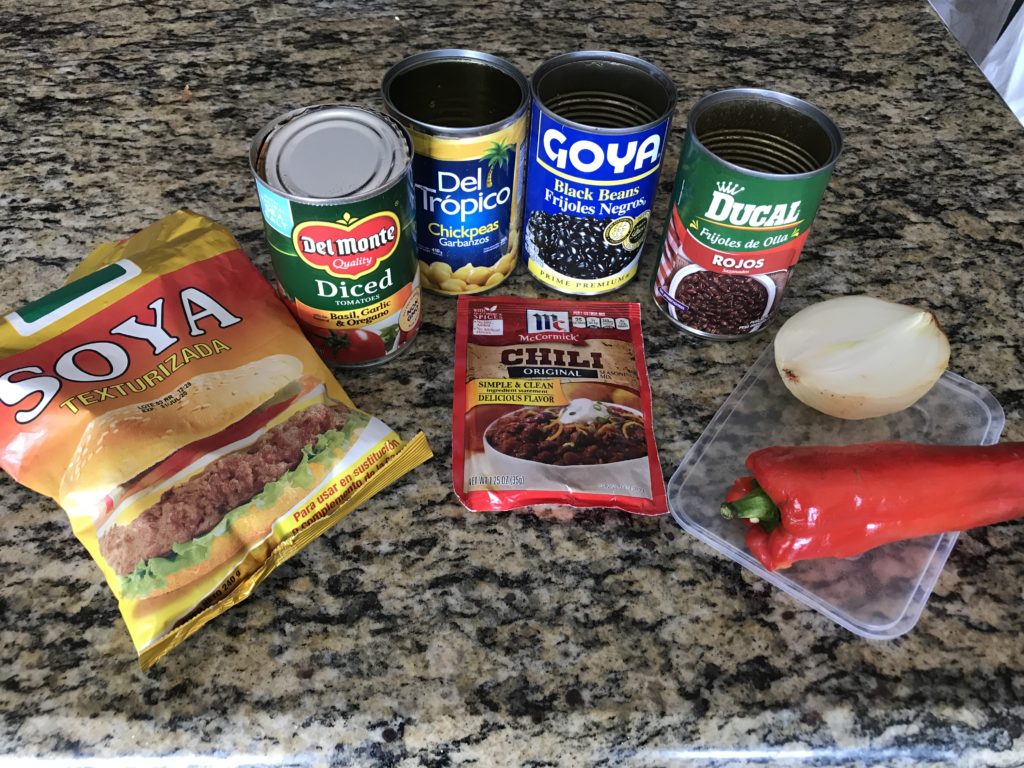
Slow Cooker Chili
Credit: I made it up!
You see the picture of the ingredients up there? Yup, that’s it! This recipe really what you want it to be (or have available). For 5 servings, I usually include:
INGREDIENTS
- 1 can of black beans
- 1 can of red beans
- 1 can of chickpeas
- 1 can of diced tomatoes
- 1 packet of chili seasoning
- Diced pepper and onion to your liking
- As much crumbled soy meat as you’d like
- (not shown) a spoonful of either tomato sauce or tomato paste
INSTRUCTIONS
Put it all in a slow cooker on low for 6+ hours.
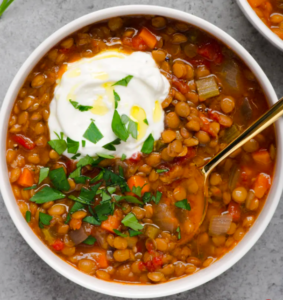
Slow Cooker Easy Lentil Soup
Image Credit: Maria Siriano
Recipe Credit: The Kitchn
SERVES4; makes about 6 cups
INGREDIENTS
- 4 cups (1 quart) low-sodium vegetable broth
- 1 (14-ounce) can diced tomatoes (do not drain)
- 1 small yellow onion, diced
- 1 medium carrot, diced
- 1 medium celery stalk, diced
- 1 cup green lentils
- 1 tablespoon olive oil, plus more for serving
- 2 cloves garlic, minced
- 1 teaspoon kosher salt
- 1 teaspoon tomato paste
- 1 bay leaf
- 1/2 teaspoon ground cumin
- 1/2 teaspoon ground coriander
- 1/4 teaspoon smoked paprika
- 2 teaspoons red wine vinegar
- Options for serving: plain yogurt, olive oil, chopped fresh parsley or cilantro leaves
INSTRUCTIONS
-
Place all the ingredients except the vinegar in a 3 1/2- to 4-quart slow cooker and stir to combine. Cover and cook on the LOW setting until the lentils are tender, about 8 hours.
-
Remove the bay leaf and stir in the red wine vinegar. Ladle into bowls and top with a dollop of yogurt, a drizzle of olive oil and chopped fresh parsley or cilantro if desired.
RECIPE NOTES
Make ahead: The vegetables can be chopped and refrigerated up to 5 days before cooking the soup.
Storage: Refrigerate leftovers in an airtight container for up to 1 week or freeze for up to 3 months.
Recipe Credit: Easy Cheesy Vegetarian
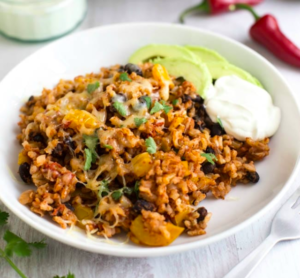
Slow Cooker Burrito Bowls
INGREDIENTS
- 1 onion, diced or thinly sliced
- 1 bell pepper (I used yellow), diced
- 1 mild red chilli, finely chopped
- 400 g tin black beans, drained (240g, or ~ 1 1/4 cups, when drained)
- 215 g uncooked brown rice (~ 1 cup)
- 400 g tin chopped tomatoes (~ 1 1/2 cups)
- 150 ml water (~ 1/2 cup)
- 1 tbsp chipotle hot sauce (or other favourite hot sauce)
- 1 tsp smoked paprika
- 1/2 tsp ground cumin
- Salt
- Black pepper
- To serve, your choice of: grated cheese, fresh coriander (cilantro), chopped spring onions, sliced avocado, sour cream, guacamole, etc.
INSTRUCTIONS
-
Add all the burrito bowl ingredients (not toppings) to a slow cooker – mine is 4.7 litres / 4 quarts. Mix well.
-
Cook on low for around 3 hours, or until the rice is cooked *see note below*.
-
Serve hot with your choice of toppings.
NOTES

Recipe Credit: Ela Vegan
Ingredients
Sauce ingredients:
- 2 red bell peppers (*see notes)
- 1 small red onion
- 4-5 small cloves of garlic
- 1 cup (240 ml) unsweetened plant-based milk (*see notes)
- 2 heaped tbsp (40 g) cashew butter (*see notes)
- 4 tbsp nutritional yeast
- 1/2-2/3 tsp sea salt or to taste
- 1 tsp paprika
- 1/2 tsp smoked paprika
- 1 tsp onion powder
- 1 tsp oregano
- 1/2 tbsp cornstarch to thicken
- Black pepper to taste
- Red pepper flakes to taste
Other ingredients:
- 7 oz (200 g) of your favorite pasta regular or gluten-free
- Fresh herbs to garnish
Instructions
-
-
Preheat oven to 375 degrees Fahrenheit (190 degrees Celsius) and line a baking sheet with parchment paper.
-
Slice the peppers into strips, quarter the onion, and peel the garlic cloves. Transfer the veggies onto the baking sheet (check the photos in the blog post above).
-
You can drizzle some oil on top or roast the veggies without oil in the oven for about 15-20 minutes.
-
At the same time cook your favorite pasta as per the instructions on the package.
-
Meanwhile, measure the other ingredients.
-
Add the roasted veggies with all other sauce ingredients to a blender (or food processor) and blend for a few minutes until super smooth and creamy.
-
Pour the sauce into a skillet or pot and heat it up over medium heat. Let simmer for about a minute, add the pasta and stir with a spoon.
-
Taste and adjust seasoning. Add more salt/black pepper/red pepper flakes to taste if needed.
-
Garnish with fresh herbs and enjoy!
-
Notes
- I used one red bell pepper and one orange bell pepper. Feel free to use only red bell peppers.
- You can use any plant-based milk of choice, e.g. almond milk, soy milk, cashew milk, etc.). I used canned coconut milk for extra creaminess.
- The cashew butter will make the sauce creamy and delicious. If you need a nut-free alternative, try tahini (keep in mind that it has a slightly bitter taste) or sunflower seed butter.
- You can also use 1/3 cup (50 grams) of soaked cashews instead of cashew butter. Make sure to soak the cashews in hot water for about 20 minutes, then discard the water and blend with the other sauce ingredients.
- Recipe serves 3.

Recipe Credit: Choosing Chia
INGREDIENTS
- 1 1/2 tbsp avocado oil (or vegetable oil)
- 1 onion, roughly chopped
- 4 garlic cloves, roughly chopped
- 1-inch cube of ginger
- 1–2 tbsp of Thai red curry paste (*see note)
- 2 tsp curry powder
- 1/2 tsp turmeric powder
- 1 Litre low-sodium vegetable broth
- 1 cup coconut milk (full-fat from a can)
- 2–3 tbsp soy sauce (*gf if needed)
- 2 tbsp coconut sugar (maple syrup or agave work too)
- juice of 1/2 lime
- 7oz rice noodles (about 1/2 a pack)
- cilantro to top
INSTRUCTIONS
-
- Heat the avocado oil in a large pot on medium-high heat.
- Add the onion and cook on medium heat for 2-3 minutes until translucent. Next, add the garlic and ginger and cook for another minute.
- Add the Thai red curry paste, curry powder, turmeric powder, vegetable broth, and coconut milk. Bring to a boil stirring everything together, then lower the heat to medium-low and let simmer for 5 minutes.
- Next add in the soy sauce, coconut sugar, and lime juice and stir together. Reduce heat to low and let the soup simmer for another 5 minutes.
- While the soup is simmering, cook the rice noodles according to package directions.
- Add the rice noodles to the soup.
- Serve with fresh cilantro and a lime wedge.
NOTES
Some brands of Thai curry paste are spicier than others. I’d recommend starting with 1 tbsp and then adding more as needed to your taste. Depending on how salty your vegetable broth is to start, you may need more or less soy sauce. Taste and adjust accordingly

Recipe Credit: Sweet Peas and Saffron
Servings: 4-6
Ingredients
- 1 tablespoon olive oil
- 1 onion (chopped)
- 2 cloves garlic (minced)
- 2 tablespoons ginger (grated or finely chopped)
- 5 cups carrots (peeled & chopped)
- 4 cups vegetable broth
- 3/4 teaspoons salt
- 1/2 teaspoon pepper
- 1 teaspoon dried thyme leaves
- 13.5 oz coconut milk (400 mL; full-fat works best)
- 1/2 lime (juiced)
Instructions
-
Select the sauté function of the Instant Pot. Add olive oil and onion to the inner pot. Cook for 5-6 minutes, until onions are softened and translucent.
-
Add the garlic & ginger, cook 1-2 more minutes. Turn off the sauté function.
-
Add carrots, broth, salt and pepper, and thyme leaves to the inner pot. Stir to combine. Put the lid on, turn vent to ‘sealed’ and cook on manual high pressure for 5 minutes.
-
After the timer beeps, allow the pot to sit for ten minutes (natural pressure release), before releasing the remaining pressure.
-
Blend until smooth with an immersion blender, or carefully transfer to a stand blender and puree in batches.
-
Stir in coconut milk and lime juice, and enjoy!
Stove Top
-
Cook onion in olive oil over medium heat for 5-6 minutes.
-
Add the garlic & ginger, cook 1-2 more minutes.
-
Add carrots, stock, salt, pepper, and thyme, and stir to combine. Cook for 20-30 minutes, until carrots are soft.
-
Blend until smooth with an immersion blender.
-
Stir in coconut milk and lime juice, and enjoy!
Notes
Storage
Nutrition

Recipe Credit: Midwest Foodie
- Prep Time: 5 minutes
- Cook Time: 15 minutes
- Total Time: 20 minutes
- Yield: 6–8 servings
INGREDIENTS
- 1 tablespoon sesame oil
- 1 cup shredded carrots
- 1 cup sugar snap peas
- 8 oz. sliced mushrooms
- 1–3 tablespoons red curry paste
- 2 teaspoons curry powder
- 6 cloves garlic, minced
- 2 teaspoons minced ginger
- 6 cups vegetable broth
- 1 (13.5 oz.) coconut milk
- 8 oz. ramen noodles
- Juice of 1 lime
- Kosher salt
- fresh cracked pepper
For serving:
- Fresh cilantro
- Sliced jalapenos
- Lime wedges
INSTRUCTIONS
- Heat oil in a large pot or dutch oven over medium heat.
- Add carrots, peas, and mushrooms along with a large pinch of salt and pepper. Cook for 3 minutes, stirring occasionally.
- Add curry paste, curry powder, garlic, and ginger and cook for 1 minute, stirring.
- Stir in broth and coconut milk and season to taste with salt and pepper.
- Turn heat to medium-high and bring to a simmer.
- Add ramen noodles and cook for 10 minutes or until noodles are al dente.
- Stir in the juice of 1 lime and serve!
- Garnish with cilantro, jalapeno, and lime wedges.
This ramen reheats beautifully, but if you’re planning to eat it later make sure you separate the noodles from the broth before refrigerating. If the noodles and broth are stored together, the noodles will soak up all the broth and turn to mush. NO GOOD.
Some curry pastes can be spicy, so be sure to taste yours and adjust the amount in this recipe accordingly. I usually use Thai Kitchen red curry paste and find that it is very mild so I had the full three tablespoons in this recipe.
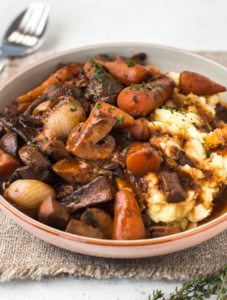
INGREDIENTS
- 9 oz baby carrots (about 250 g)
- 9 oz baby onions (about 250 g)
- 1 ¾ lb mushrooms cut into chunky pieces (I used chestnut-mushrooms & mini-portobellos) (about 850 g)
- 1 cup vegetable stock (about 250 ml)
- ¾ cup red wine (about 185 ml)
- 2 tbsp tomato puree or paste
- 1 small bunch fresh-thyme
- 2 bay leaves
- black pepper
- 4 cloves garlic minced
- 1 tbsp oil
INSTRUCTIONS
-
Peel the baby-onions and eliminate the tops and tails, but otherwise leave whole. Additionally, top and tail the baby-carrots.
-
Heat the oil in a large pan then add the mushrooms, baby onions, and baby carrots.
-
Cook over a moderate heat for 5-10minutes, adding the garlic for the last few minutes of cooking time. The mushrooms must be tender and ought to have released their juices. The carrots and onions will nonetheless be rather hard.
-
Add the red wine and turn the heat. Simmer for a couple of minutes, then add the remaining ingredients. Mix well to blend.
-
If necessary, move the mix to an oven-safe casserole dish. Cover with a lid or any foil then bake at 375°F for 40minutes, or till the onions and carrots are cooked to your liking. Taste the seasoning.
-
Serve and enjoy!

Recipe Credit: Jessica in the Kitchen
*These legit taste like chicken nuggets!
INGREDIENTS
- 1 lb block tofu pressed and drained of liquid
Marinade
- ¼ cup liquid aminos* + 1 tablespoon of soy sauce or tamari (any is fine)
- ½ cup filtered water
- 1 teaspoon garlic powder
- 1 teaspoon onion powder
- 1 teaspoon smoked paprika
- 1 tablespoon nutritional yeast if you don’t have this, that’s okay
Batter
- ¾ cup any nut milk or ANY vegan milk (I used unsweetened almond milk)
- 1 ½ teaspoons apple cider vinegar or regular vinegar
- 1 cup gluten-free flour or regular flour (I used Bob’s Red Mill’s Gluten-Free All Purpose Baking Flour)
Crumb Mixture
- 1 ¼ cup gluten-free breadcrumbs or regular breadcrumbs (I used Nature’s Path Organic Crispy Rice Cereal and pulsed them in my food processor until they resembled panko breadcrumbs)
- 3 teaspoons smoked paprika
- 3 teaspoons nutritional yeast
- 1 teaspoon garlic powder
- 1 teaspoon onion powder
- 1 teaspoon Italian seasoning
- 1 teaspoon sea salt
- ¼ cup of oil if pan-frying, if not, instructions for baking are below
INSTRUCTIONS
-
Take your pressed tofu and slice it in half lengthwise (so you end up with two large slices the same length and width as the original). Tear the tofu into 1-inch cubes. I like to use a ruler to help me measure the first tear, then use that as a guide, but it doesn’t seem to be exactly 1 inch.
-
In a bowl or glass tupperware, add all the marinade ingredients and stir to combine. Taste it, you can add more liquid aminos if you want your’s saltier, or more water. Add in tofu and stir to combine so all the tofu is coated. Marinade for at least 15 minutes, but up to overnight. While marinating, prepare your bowls with the flour, the buttermilk, and the crumbs.
Batter & Crumb Mixture
-
In a bowl, add the nut milk and the apple cider vinegar. Stir to combine and let sit for about 2 minutes. This is your buttermilk mixture.
-
Add the flour to its own bowl and line up side by side.
-
In a bowl add all the crumb mixture ingredients. You can use gluten-free panko breadcrumbs or make your own by food processing 1 ¼ cups of brown rice krispies. Line up in a bowl beside the buttermilk. Line a baking sheet beside that – this is where you’ll place your tofu pieces before pan-frying them, or layer them to bake them.
Putting it All Together
-
Take one tofu piece from the marinade. Dip it into the flour, shaking off all the excess flour, then into the buttermilk. Shake off the excess buttermilk, then dip it back into the flour, then into the buttermilk again, shaking off all the excess again. Then dip it into the crumb mixture, roll around, and place on the baking sheet.
-
Once you get the hang of it, you can add several pieces at a time (I do like 10 pieces maximum at a time). This battering process is very forgiving!
-
When you’re done all the pieces, it’s time to cook them.
Cooking the Tofu
-
Heat ¼ cup of oil in a baking over medium-high heat. When the oil is hot, add one piece of tofu. Cook for 1 ½ minutes on each side (check for browning) or until golden brown, then flip and cook for another 1 ½ minutes on the other side. Remove to a paper towel to absorb the excess oil.
-
Continue to cook the rest, but you can now add several pieces of tofu now that you’ve tested that the oil is hot and you have your cooking time figured out. Don’t overcrowd the pan since it’ll reduce the temperature of the oil, making them not as crispy. It’s best to leave enough space between each piece of tofu.
-
Continue until you’ve cooked all of the tofu. Allow to cool slightly, then serve immediately by itself, or with a dipping sauce. You can also add these to tacos, sandwiches and many other uses!
-
To BAKE these: Preheat the oven to 400F/200C. Line the battered and breaded tofu pieces on the baking sheet and spray with some cooking oil on both sides. Bake for 25 minutes, flipping once way at the halfway mark. Serve and enjoy!
NOTES

Recipe Credit: Running on Real Food
Spicy Chickpea Veggie Burgers
- PREP TIME: 10 MINS
- COOK TIME: 10 MINS
- TOTAL TIME: 20 MINUTES
- YIELD: 6–8 BURGERS
INGREDIENTS
- 1 19 oz can (2 cups) chickpeas, drained, well-rinsed and mashed
- 1/2 red onion, finely diced
- 1 small zucchini, grated
- 3 tbsp finely chopped cilantro
- 3 tbsp (45 mL) red wine vinegar
- 1 tbsp (15 mL) sriracha sauce
- 2 tbsp (30 g) natural peanut butter
- 1 tsp cumin
- 1 tsp garlic powder
- 2 tsp black pepper
- 1/2 tsp sea salt
- 1 cup (100 g) quick oats (gluten-free if needed)
- 2 tbsp (30 ml) extra virgin olive oil
INSTRUCTIONS
- After draining and rinsing the chickpeas, place them in a bowl and mash them with a fork or pulse a few times with an immersion blender.
- Add all the other ingredients to the bowl and use your hands to mix very well.
- Form into 6-8 patties.
- Cook on the BBQ around 400 F for approximately 10 minutes each side or fry in a pan with some oil for 3-5 minutes per side.
NOTES
- For successful recipe substitutions and alternative cooking methods, read through the comments on this recipe’s website linked above.
- These burgers can be frozen after cooking and re-heated in the oven as needed.
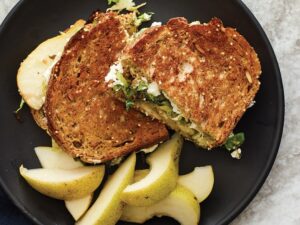
Brussels Sprouts and Pear Grilled Cheese
Recipe Source: Self.com
INGREDIENTS
- 1teaspoon olive oil, divided
- 3brussels sprouts, thinly sliced
- 2slices 100-percent whole wheat bread
- 1ounce soft goat cheese, at room temperature
- 1/2medium pear, cored and thinly sliced, divided
- 1ounce Parmesan, grated
DIRECTIONS
-
In a nonstick skillet over medium heat, heat 1/2 tsp olive oil. Add brussels sprouts and cook, stirring, until soft and bright green, about 2 minutes. Remove from skillet.
-
Spread 1 slice of bread with goat cheese. Assemble sandwich with cooked brussels sprouts, 1/2 pear, and Parmesan.
-
Wipe out skillet and return to medium-low heat. Heat remaining 1/2 tsp oil. Add sandwich and cook until underside is toasted and cheese starts to melt, about 3 minutes. Flip and cook until browned and cheese is melted, about 3 minutes more.
-
Serve with remaining pear slices.
WANT FREE STUFF?
Sign up below and every month, as a member, you have a chance to win products that help you reduce your environmental footprint. Plus, you’ll receive the weekly newsletter with the podcast show notes and summarized action tips.